Clinical Reporting Application Overview
Introduction
Advanced Reporting (AR) provides communication with networked echocardiography, stress ECG, hemodynamic, and Health Level Seven (HL7) systems. Reports can be prepopulated with information captured at the point of care. This information is then imported into Clinical Reporting Application (CRA), eliminating the need for you to manually enter data into a clinical report. After Synapse imports the data, you can review and edit the data in a clinical report.
|
Note: |
|
The System Administrator configures the way in which Synapse imports the data, from external systems based on site requirements.
- The Clinical Reporting Application Interface
- Resizing the Report Workspace and Preview
- Exiting Clinical Reporting Application
The Clinical Reporting Application Interface
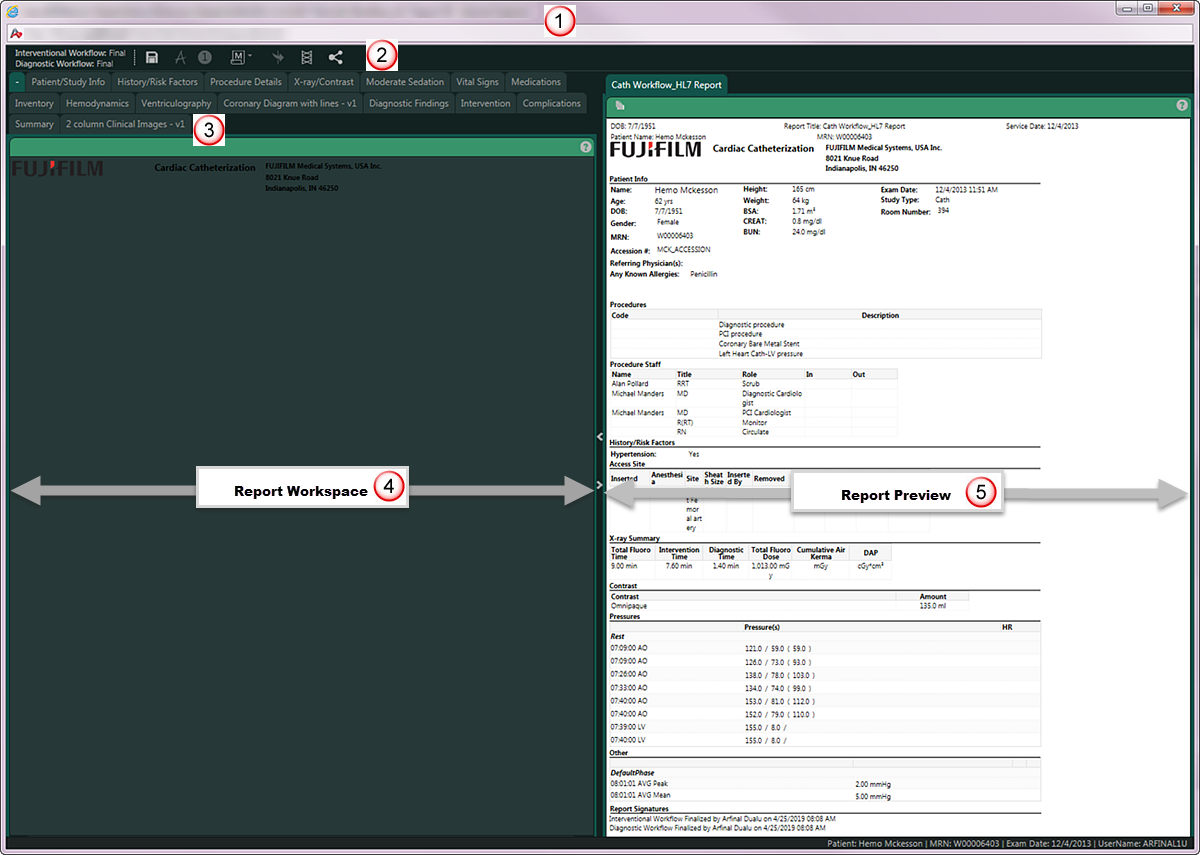
The Clinical Reporting Application (CRA) interface is launched when the Advanced Report function is activated for a study. When launched, the CRA interface opens with the current report template.
The report Workspace and Preview panes are independently controlled. Diagram controls, Findings controls, and the Event Log are updated from the Workspace. When you enter data into a particular tab within the Workspace, the Preview does not automatically scroll to the corresponding location to display that section.

This table describes the screen items identified in the image above.
|
Screen Item |
Description |
|---|---|
|
|
|
|
|
|
|
|
|
|
|
|
|
|
|
Resizing the Report Workspace and Preview
Introduction
Clinical Reporting Application uses a resizing border to separate the Workspace and Preview panes. Each time you load a report, the report Preview pane is collapsed. Use the resizing controls to adjust both the Workspace and Preview panes.
Steps
- Select the appropriate step to resize the report Workspace and Preview panes as needed.
|
If you want to do this... |
Complete this step... |
|---|---|
|
Maximize the Workspace and hide the report Preview pane. |
|
|
Return the report Workspace and Preview panes to their previous sizes. |
|
|
Maximize the report Preview and hide the report Workspace pane. |
|
|
Return the report Workspace and Preview panes to their previous sizes. |
|
|
Simultaneously resize the report Workspace and Preview panes. |
|
Exiting Clinical Reporting Application
Introduction
Clinical Reporting Application typically closes when the final step in a workflow is accomplished, such as when you promote a report to the next tier or if you are finalize a report. You can also close a report window using the report Windows Close command.
Steps
- Click Close
 to exit the CRA
report browser window.
 - (Optional) If you have any unsaved changes, you will be prompted to save those changes before closing the study.


